Showing posts with label artichokes. Show all posts

Tuesday, August 23, 2016

Edible Landscaping Your Front Yard - Start Now

Striking ornamental kale can be planted among edible kale

Fall is just ahead and it’s the perfect time for bold action: adding edibles to your suburban front yard. If you have a conventionally landscaped front yard and you aren’t sure how to begin, here are some ideas to help you get started.

Getting Started
For the front yard there is still an aesthetic norm to overcome in lawn-centric suburbia, but that convention has been shifting steadily.  Growing vegetables, herbs, and fruit boldly in plain sight needn’t be the eyesore of the neighborhood if you give some thought to how they will fit into your garden design. In my opinion, both edible and ornamental plants coexist in a beautifully in a garden. It doesn’t have to be one or the other.

America spinach with violets

To start, you'll have to consider the exposure to direct sunlight, at least 4-6 hours per day, and the condition of the soil. Check with your local UC Master Gardeners for more details on planting and soil prep for your region. They will also have seasonal planting charts. Sign up for their excellent monthly newsletter that reminds you about seasonal garden tasks, including planting edibles.

Below are some simple ideas for small additions with the potential for a big impact.

Where to Add Edibles Now
Flower Beds and Borders:
If you have existing flowerbeds, that’s a great place to begin. If not, you might consider removing a strip or patch of lawn to make a combined flower and edibles bed. This would be nice as border along a walkway or fence, or even in the center of a lawn (remove and prepare a square or round shaped patch). Small shrubby herbs such as thyme (choose from lemon or lime thyme) or sage (add a trio of culinary sage with blue-gray leaves, tri-color sage edged with purple, cream and green, and yellow sage) fit well among flowers, and they hold up to the mild frosts in our San Francisco Bay Area. Rosemary is a popular, large landscaping plant that is covered with sweet blue-lavender or purplish flowers for months of the year. 


Trailing rosemary is attractive, fragrant, and great for cooking

You can easily slip in vegetable seedlings when planting out flowering annuals or among bulbs.  Spinach, lettuces, kale (including ornamental kale), and Asian greens, can be grown in fall since they prefer cooler temperatures and can be grown during winter in our region. These leafy green veggies will add attractive foliage to a bed of flowers, and if you really want to be on your game, plant edible and beneficial flowers, such as calendulas, and add nasturtiums and marigolds for summer.

The viola family, which includes violets and pansies, are good cool weather choices for fall and are high impact for their varied colors. This group is semi-perennial in mild winter climates and provides lots of blooms fall through spring, going dormant in hot summer weather (some will reseed). For annuals such as nasturtiums, which are frost tender, wait until spring. But beware: if you buy nursery seedlings make sure they were grown without pesticides and herbicides, otherwise, don't eat the flowers!

Artichokes have spectacular foliage, but need space

Go Big and Bold with Artichokes
If you have the space for them, artichokes are a spectacular addition to the garden. Their bold foliage is striking, and in spring they'll reward you with edible artichoke heads. I particularly love the violet ones, such as Violetto and Purple of Romagna. Romanesco is a tightly rounded variety that is tinged with purple. The green globe types have equally beautiful foliage. Fall through early summer is the best time for artichokes. They tend to go dormant with the heat of summer, at this point you can cut them back and keep them mulched. Mine are shaded in the later part of the afternoon for the hot sun so they begin to sprout new growth if I water them occasionally during summer. Towards fall they really start to bulk up.

All of them will eventually yield huge flowers with purple stamens if you leave the heads on the plants. I always leave a few to flower, then watch the bees enjoy them!

Artichokes will eventually explode with purple flowers if they aren't harvested

Containers:
Planting into containers is another great way to experiment with edibles since containers can be moved around, grouped in different locations or used as a welcoming feature on a porch. Numerous colors, sizes, shapes and textures are available to match or brighten up your existing landscape. Containers filled with flowers and lettuce are sure to be a conversation piece. For the coming cool months you could pair lettuce, kale, or spinach, in containers with edible flowers for a beautiful display. Mix with ornamental kale for an extra showy focal piece.

Showy heirlooms: Dwarf Gray Sugar Peas date back to 1892

Trellises:
I also love growing snap peas and snow peas over winter and early spring. They are beautiful on a trellis, and you can plant flowers and leafy greens around them. I have several different trellises in the front yard of different types and sizes for climbing edibles. Lovely bicolored Dwarf Gray Sugar Peas resemble sweet pea flowers (which are NOT edible) and would be a winning combination with cool season flowers in your front yard.

Start Small, But Start Now
Eating sweet crisp pea pods with fresh salad greens and herbs, plus edible flowers from your own front yard may inspire you to expand your edible landscape into a beautiful productive kitchen garden by the time spring rolls around. A good approach is to start gradually. You can start this fall by adding these varieties that will overwinter well, then plan to add warm season edibles in spring and summer. Enjoy learning as you grow, gather ideas about what you enjoy growing and eating, and design features you’d like to add. If you are new to growing vegetables and herbs, getting some experience first will help shape your overall landscaping goals.

Note: during our cool and rainy months in California you will have to have a plan for slug and snail control. Handpicking in the early morning or evenings is effective if you keep at it. You can supplement handpicking with a sprinkle of  a non-toxic product such as Sluggo.

A earlier version of this post was published in March 1, 2012 at Eat Drink Better

Photos: Patricia Larenas, Urban Artichoke


Monday, April 23, 2012

Edible Garden Photo Essay


In this photo essay I want to share some special images from my ediblegarden. I spent Earth Day working in my garden and as always I was inspired by the beauty of our edible plants.

I can't think of a better way to honor our planet than to take time to appreciate and cherish its natural beauty, and that may be as nearby as our own backyards. It's worthwhile slowing down to savor the the unexpected treasures we find there waiting for us, every day.


Mourning doves built a nest in our leafy grape arbor and stayed all summer. It’s a bonus that our organic garden is safe haven that attracts wildlife.


Winter squashes always amaze with their gorgeous textures, colors, and enormous diversity. This summer I'm excited about growing GuatemalanBlue Banana and Stella Blue Hokkaido. Check heirloom seed sellers for unusual varieties to grow.


This Lemon Cucumber and Cranberry Bean both trellised up our tall Jerusalem Artichokes last summer. The trio seemed very happy growing together!


Violet artichokes (Violetto shown above) are truly dramatic and stunning, especially the first time you see them on the huge bushy plant.


Scarlet Runner Bean flowers are showy and beautiful climbing up on a trellis and can be grown in a container, as in the photo above. I love climbing beans and grow them on pole teepees or trellises every year.

May you have a happy Earth Day every day!

This post was also published on Eat Drink Better.

Photos: Patricia Larenas, Urban Artichoke

Sunday, April 15, 2012

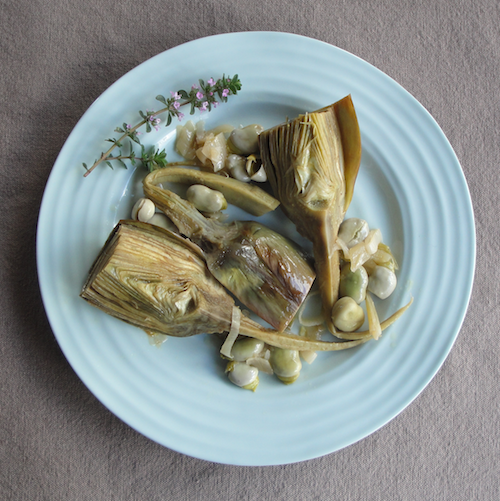
Braised Artichokes in White Wine


As I wrote in my previous post, spring kicks off artichoke season, and although I love them best just boiled and served with a dipping sauce of lemon and olive oil,  this recipe I adapted from Alice Water’s book, The Art of Simple Food is quickly becoming a favorite. It’s uncomplicated and really satisfying for artichoke lovers. It's an easy recipe for delicious artichokes simply braised with white wine and a few aromatics for flavor.

For this recipe I used  my beautiful purple Violetto artichokes right out of my garden, but any type will be tasty cooked this way.

You Will Need
2 Medium or large artichokes, green globe or other type
1 Small onion, diced
2 Cloves of garlic, or 2 stalks green garlic
2 - 4 Sprigs of fresh thyme (Lemon Thyme is extra good in this)
¼ cup white wine
¼ cup water
Extra virgin olive oil
1 Lemon, cut into wedges

Makes 2 - 4 servings

Saute the Onions and Garlic
Dice the onion and trim the green garlic by removing tough outer leaves. Slice it lengthwise in quarters. Rinse the sprigs of thyme and pat dry.
Heat a couple of tablespoons of olive oil in a wide heavy bottomed pot (you’ll use the lid later). Add the onions, garlic, and sprigs of thyme. Saute over gentle heat until they are soft, being careful not to burn, about 5 minutes.


Prepare the Artichokes
While the onions and garlic are sautéing, prepare the artichokes by rinsing well under cold water. Cut the top third of the artichokes off with a sharp knife, and remove the tough outer leaves of each artichoke by snapping them off.

How many leaves should you remove?
Here's the thing: you can leave some of the large leaves on, or remove them until you reach the tender light green leaves in the center. It's a matter of preference. The tough leaves will have to be eaten as finger food. If you prefer, use only the tender center of the artichoke, which can be eaten with a knife and fork. I can’t bear to waste perfectly edible leaves, so I don’t mind having to pick off the tough leaves with my fingers to eat the meaty base of each leaf, one by one.

Trim the stems by peeling off the stringy surface layer. Next, cut the artichoke down the middle lengthwise, and cut each half once again so it’s in wedges. For large artichokes you can cut them again (into eights).  Scrape out the choke with a spoon (or carefully cut it out with your knife) or remove it after cooking.

As you work, rub the cut sides with fresh lemon juice so that they won’t turn brown.


Braise the Artichokes
After the onions and garlic are soft, add the artichokes (cut sides down) to the pan and cook for a few minutes (3 – 5 minutes). Add the water and wine and cover the pan with the lid. Cook gently until the artichokes are tender through the thickest part at the base (about 10- 15 minutes).  Check them at 10 minutes to make sure there is still some liquid left- if needed add a bit more water or wine. They should be moist and have a couple of spoonfuls of the sauce left when done.

Serve and Enjoy
Serve the braised wedges by spooning the onions and sauce over them, and with wedge of lemon. This is wonderful as a side dish or an appetizer, either warm or cold. It keeps well in the refrigerator for a couple of days.

Variations:
Add fresh fava beans or freshly shelled peas to the sauté when adding the artichokes; use sliced leeks instead of onion.

See my recipe for spring artichoke salad.

Photos: Patricia Larenas, Urban Artichoke

Thursday, April 12, 2012

The Mystery of Artichokes

-->

The Italians are famous for growing an incredible diversity of violet heritage artichokes, from Violetta di Chioggia and Purple of Romagna, to Romanesco Italian Purple. And they are rightfully very proud of this diversity. I’ve never seen any of these in any US market, even in California, so I decided to try growing them myself. 

Besides being tasty and tender, the purple varieties are stunningly beautiful, especially as they develop on the plant. Artichokes are commonly propagated by dividing an established plant. They are not reliably grown from seed. I learned firsthand why that is: the seeds don’t grow true to the parent plant. My mystery artichoke (photo above) came from a packet of Purple of Romagna seeds that I grew and planted in my garden. I knew that the results might vary, but I couldn't resist giving it a try from seeds.  

Some of the seeds grew into thornless Purple of Romagna, and some grew into spiny plants with very long sharp thorns on the slender, dark purple artichoke. But I'm not sorry I tried, because the spiny artichokes are visually dramatic (see photo above) and add to my collection. They are also great for eating.

I suspect my Violetto is the same as Purple of Romagna

An international symposium on the artichoke and its relatives is going on as I write this, in Viterbo Itay, organized by the International Cynares Project.  A study conducted in Italy that suggests that many of their artichokes are actually the same cultivar, they just have different names, as they are typically named for the region or city in which they are grown. This makes sense, and I suspect the Violetto I planted as a seedling from a nursery may be the same as the Purple of Romagna I grew from seed.  I'll keep researching artichoke varieties, but I also love the mystery. 

Photos: Patricia Larenas, Urban Artichoke

Spring Artichoke Salad


Green Globe, my violet mystery artichoke, and Violetto

 If you can’t grow your own artichokes, look for very fresh, young artichokes to make this raw artichoke salad. It will surprise you with its delicate nutty flavor. I'm lucky that I live in a near-perfect climate for growing my favorite vegetable!

Besides abundant cheery flowers, spring brings tender artichokes and a chance to experiment with new recipes. I’m growing at least four different types: Green Globe, Violetto, Purple of Romagna, plus a mystery artichoke that is dark violet and full of long sharp thorns.

All of them are tasty and the plants are beautiful, lush, and elegant – perfect for an edible landscape.  And it’s fun to have a variety to try out in recipes. But if you can’t grow your own, look for the freshest young artichokes that you can find.

A simple salad of raw artichoke, arugula, and shaved Parmesan cheese

You Will Need
1 Medium very fresh artichoke per person, Green Globe or other type
1 Lemon
Salad greens: lettuce, arugula, or mixed baby greens
Extra virgin olive oil
Parmesan cheese, shaved

Prepare the Artichokes
Prepare the artichokes by rinsing well in cold water. Remove the small leaves around the base of each artichoke by snapping them off. Cut the top of the leaves off with a sharp knife to about one and a half to two inches from the base, and remove tough outer leaves until you reach the tender light green leaves in the center.

Cut the stem off at the base, cut the peeled artichoke down the middle lengthwise, and slice each half very thinly lengthwise. Do a taste test at this point to make sure it’s not bitter (if it tastes bitter, saute in olive oil for several minutes). Toss the slices with fresh lemon juice in a bowl so that they won’t turn brown, then drizzle with olive oil.

Serve and Enjoy!
Arrange the salad greens on individual salad plates and mound the artichoke slices on top of the greens. Sprinkle with kosher salt and top with shaved Parmesan cheese, if desired. This light salad makes a great first course for a spring supper.

Read more more about how to grow artichokes.

Photos: Patricia Larenas, Urban Artichoke

Friday, April 2, 2010

Spring Starts

This year I tried starting my plants from seed. I've done that a bit in the past, but only with the really easy stuff- like string beans. I don't know why I thought it would be so difficult- surprise! It's not hard to do, for most of the plants I've tried so far. I have spent a lot of money buying seedlings in my lifetime so I thought it would be smart to save some money, plus I love growing things: I find it very satisfying and extremely addicting. Even though I live in the San Francisco Bay Area where the winters are pretty mild, we still get night temperatures into the 30's and maybe 20's, with frost. So that means even though we have a very long growing season and an early spring, most edibles are best started indoors if the night time temperatures are not reliably into the 50's (I just learned this). Since I don't have a green house or cold frame (do we really need these in our area you might ask?), I tried it out in the bay window of our dining room. As you can see in the picture, this is not very many plants, but it's a start- I ran out of room quickly! I used potting mix and an assortment of left over six-pack and other small containers saved from my purchases. The real secret to success is to keep the starts moist, and don't let them dry out (Renee's Garden web site has some tips with photos).


I started two kinds of sunflowers in February (too early I think), and these can be transferred outside soon. "Lemon Queen" is one I loved last year. It is a multi-branching type that gets lots of flowers about 5 to 6 inches across. They have pollen, so the bees love them too, in fact it is a highly recommended plant for attracting bees to the garden by the Great Sunflower Project (this is a volunteer participatory effort to gather data on bees). It makes a stunning addition to the summer garden. I'm trying "Chocolate Cherry" also, which has maroon flowers of the same multi-branching type, but sadly, no pollen.  I've also started some Roman chamomile, the herbal kind, not the ornamental ground cover. I bought a small plant last fall and I love the wonderful apple-like scent of the foliage, and it produces a profusion of flowers to harvest for tea. The seeds sprouted easily indoors in plain potting mix.

I recently bought some seed packets at my favorite garden supply store, Common Ground. The seeds are from Renee's Garden. She has wonderful special varieties of flowers, herbs and vegetables, so I bought a bunch. This is Renee Shepherd, who also writes articles for gardening magazines and has a great web site. I was so inspired by her article on growing zinnias that I bought some of her zinnia varieties, and the couple I tried so far (Persian Carpet and Apricot Blush) have started just fine. She also notes how to collect and store the seeds for the next season's planting. The article is in a special edition magazine Starting from Seed published by Fine Gardening Magazine. It has lots of tips and how-to on seed collection and starting plants from seeds.

Other seeds I tried were her "Baby Mesculin Salad- Paris Market Mix". We are salad fiends in my family, and my goal is to keep a supply of salad greens in the garden all year round. (I was amazed to find that lettuce and other greens are not damaged by frost, at least where I live.) I sowed these directly outside in a barrel planter (covered with mesh to protect it from our bird neighbors).


The seedlings have already come up. This barrel has been great for some added space to grow lettuce and other greens that prefer cool temperatures. It sits under our silk tree, so it has some shade on hot summer days, and sun in the winter when the tree drops it's leaves.

To keep up the early spring spirit, I recently started some divisions of our beloved globe artichoke. It is in it's second year, and is actually made up of about 3 to 4 plants now. It produces twice a year, in spring and fall, and yields a surprising amount of artichokes, (which I tend to buy weekly when they are available). You can see my two starts in the picture below- one is for a friend, with whom we share plants and produce back and forth every year, and one is for my mother and sister's garden in Santa Cruz.


Speaking of sharing, another neighbor who lives down the street from us has a lovely place on the corner, and I always admired their gardens. They have a diversity of plants, minimal lawns, and a beautiful mini orchard on the side of the house (below). The picture shows how the young apple and citrus trees are leafing out. What a great use of front yard space! But they also have borage in the yard,


which I have been wanting to introduce into my own front yard. It attracts bees and it is said to be a beneficial companion plant, and may repel tomato worms (John Jeavons). The beautiful blue flowers are edible too. Since it self seeds easily, I didn't even want to spend money on a seed packet, so I asked our kind neighbors if I could take a small bunch from their garden. Of course they obliged right away, so I showed up with my spade and a bucket, and she grabbed a shovel and gave me a couple of big clumps (a liberty I was too shy to take in her garden!).  Here is a picture of her borage in full bloom below, looking lovely amid the irises and California poppies. The borage is the plant with fuzzy looking stems and small star-like blue flowers. She told me that she had brought home another plant from her mother's garden, and the borage came as a tag-a-long and established itself in her garden. We got to chatting and she ended up giving me a dozen eggs from her family's ranch in Monterey, where her family has lived for 150 years. It was wonderful to share our love of plants and passion for gardening.

What a great start to spring...