Showing posts with label grow your own. Show all posts

Monday, August 31, 2020

Saving Seeds from Your Garden

Learn how to save seeds from your vegetable garden in this series
for beginning seed savers.


I'll be giving two presentations on the art and science of saving seeds via Zoom, through the Mountain View Public Library . 

 See the descriptions below:

You must register separately for each, part I and part II. See the links below:

Seed Saving Basics, Part I: Thursday, September 17, 5pm- 6:30pm

Description: This talk is an introduction to the art and science of saving your own seeds. Learn the basic techniques for saving seeds from popular annual vegetable garden plants. Covered in part I: why we save seeds, the basic botany of flowers and pollination, saving pure seed and when to worry about species crossing.Vegetables discussed: lettuce, tomatoes, beans (includes peas), and peppers. Storing seeds will also be discussed.

Register for Part I: September 17, Part I


Seed Saving Basics Part II : Thursday, September 24, 5pm- 6:30pm


Description: this talk is a continuation of Part I, and will cover saving seeds from cucumbers and squashes, and biennial crops, such as brassicas (kale, broccoli etc) and carrots. If time allows popular herbs such as sweet basil and cilantro will be discussed. Plus simple ways to test the viability of your stored seeds (germination testing).

Resources for learning more about saving seeds and plant propagation will be provided.


Register for Part II: September 24, Part II


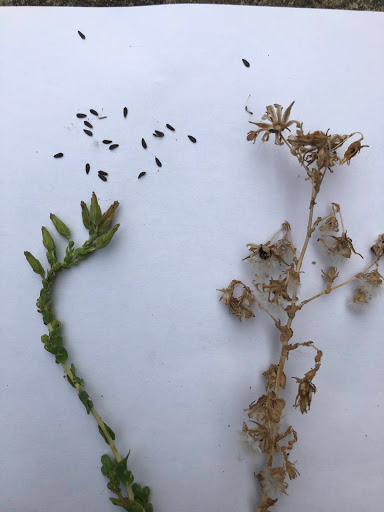
Lettuce seeds ready for harvesting
Lettuce seeds 

Photo credits: Patricia Larenas

Sunday, February 7, 2016

Grow Vegetables for All Seasons, a Lecture on Wednesday, Feb. 10


I hope to see you Wednesday night, Feb 10th, at 7:00pm in Los Altos for the next lecture in the series sponsored by the Western Horticultural Society, (WHS)!

Vegetables For All Seasons, a Talk by Drew Harwell

Drew Harwell has been eating out of local gardens everyday for the past 13 years. He recognizes (and champions) that living in the Bay Area, we have the luxury to grow food year-round. Drew will share ways to organize and plan your garden for year-round harvest. Topics will include diversified crop rotations, techniques such as biointensive gardening and permaculture, which maximize food production and maintain soil health and fertility.

Drew Harwell, Edible Garden and Permaculture Consultant, Palo Alto, CA  
Who:
Drew is an edible garden and permaculture consultant in Palo Alto, California. He is the manager of Chef Jesse Cool’s Seeds of Change Garden and a Stanford University lecturer. He has managed the Stanford Community Farm and the Common Ground Demonstration Gardens. A native of Palo Alto, he grew up gardening with his family in their community garden plot behind the main library.


When:
Doors open at 7:00 pm & the meeting starts at 7:30 pm.

Where:
We meet at the Christ Episcopal Church, 1040 Border Road, Los Altos. Park in upper lot. For details go to: the WHS website. You can check our Newsletters on the website for direction and a map. We meet at the Christ Episcopal Church, 1040 Border Road, Los Altos. Park in upper lot. Founded in 1963, the Western

About WHS
Founded in 1963, the Western Horticultural Society is made up of horticulturists, botanists, landscape designers and architects, nursery people, students and avid gardeners & Master Gardeners.
Lectures are free to WHS members and students with current student ID, and $5 for non-members. The public is welcome to attend!

Saturday, July 6, 2013

Visit 11 Edible Gardens on the Edible Landscaping Tour


A lush front yard with squashes and watermelons among the flowers

The rampant abundance of delicious summer crops may have you daydreaming about how to add more vegetables and fruits to your home garden. Going on a local self-guided tour of unique and notable suburban edible landscapes is a fantastic way to get inspired with great ideas and a perfect opportunity to meet enthusiastic gardeners who love sharing their gardens. 

Here on the San Francisco Peninsula we are fortunate indeed to have Common Ground’s annual Edible Landscaping Tour coming up on July 20th, now in its 7th year. 

An apple espaliered on a fence is attractive and a good use of space

I've been on the organizing committee for several years now and I'm always delighted by the innovative ways that gardeners incorporate food plants, raising chickens, ducks, rabbits and bees on their suburban lots. Some take a decidedly urban farm approach, while others integrate fruit trees and vegetable gardens into their otherwise ornamental landscapes.

Keeping chickens and beehives is no longer rare in suburbia

Either way, each garden is beautiful, interesting and a reflection of the family's lifestyle and their quest to create a higher quality of life right at home.


Beans displayed on a teepee of bamboo poles

And it's a natural step to spread goodwill and delight by sharing extra fruit, eggs and beans with neighbors and friends. 


A young girl cuddling her chicken

From my perspective, gardening is not just a pleasant leisure-time activity, it’s critical for a healthy future. 

It's about:

  •  building a supportive community around growing food organically and sustainably in our suburban neighborhoods.  
  • understanding where our foods comes from and connecting with the Earth's processes that support this almost magical ability.

Grape vines on this pergola create an outdoor dining room

When I visit these gardens I see simple everyday acts that have deep meaning and far reaching consequences.


Vegetable beds decorated with children's tiles

When I reflect on all of the trouble in our world, these simple positive acts seem like a profound way to add much needed joy at a very basic level. 

That's why the Edible Landscape Tour is at the top of my "must do" list every summer!


Photos: Patricia Larenas, Urban Artichoke


Friday, March 8, 2013

Fire Fighter Grows Community Through Gardening


A fruit tree in bloom at the fire house

Firefighter paramedic Mike Robbins, not only serves our community of Mountain View, California,  by risking his life to save others, but he serves up fresh vegetables to his teammates through his love of gardening. Mike established an edible garden with vegetables and fruit trees at Mountain View Fire Station 1, that not only provides fresh produce for the station's meals together, but he also shares the bounty with the neighbors in his residential location near downtown.

I met Mike when he and his fellow fire fighters dropped into the Chez TJ kitchen garden last Spring to chat about our mutual passion for growing food. What a great idea to have an edible garden at a fire station - because as Mike has found, it's also therapeutic and relaxing to work in the garden.


Firefighter and EMT Joe Wortham in the firehouse garden

For those in stressful jobs, the activity of growing and sharing food together is certainly nurturing, nourishing, and sustaining in many ways. I dropped by the fire house recently to how the garden was coming along and to say hello. Mike had been deployed elsewhere for the day, but I met his crewmates, Joe Worthman and Steve Desirio, both fire fighters and EMTs (paramedics). 

They were happy to show me the garden, and I even cajoled one of these camera shy heroes, (Joe) into a photo. Apparently the urban legend about all fire fighters being handsome heartthrobs is true, as you can see for yourself in the photo above. Fire fighter Steve Desirio is an avid gardener at his home in San Francisco, where he grows edibles all year-round (in the fog, no less) and even starts his veggies from seed. They both gave abundant credit to Mike by saying that the garden is all his doing.


You can read an engaging article about Mike and his garden on California Bountiful Magazine.

A big thank you to Mike and his crewmates for their service to our community!


Photo: Patricia Larenas, Urban Artichoke.

Wednesday, December 26, 2012

Celebrate the Season with Stuffed Heirloom Squash


Winter squashes are something I look forward to each year, especially after I began growing my favorite variety - the gorgeous Stella Blue Hokkaido (pictured above, center). It has a curiously blue- green skin and delicious, dense, rich orange flesh. 

I made quite a gorgeous and festive dish for the holidays by stuffing the squash with a tasty rice preparation that works very well when made ahead of time, then assembled and heated for your dinner.


Tips for Success with Stuffed Squash
The trick is to roast the squash as prepared above in the photo, before you stuff it. Carefully cut the top off to form a bowl, and score the inside. Rub lightly with olive oil or butter to keep it moist.

I baked mine at 400 F for about 30 minutes. The squash meat should be just tender - not mushy. Take care to check it while roasting so that it doesn't get too soft and collapse. 

While the squash is in the oven, a simple and versatile stuffing can be made with cooked rice (I used brown rice mixed with wild rice) flavored with sauteed onions, celery, herbs, (thyme, rosemary) and mushrooms. Saute the onions and additions separately then mix with the rice in a bowl. Adding chopped nuts such as pecans or walnuts and a handful of raisins creates a tasty dish appropriate for holidays celebrations.

Spoon the mixture into your partially baked squash, then return to the oven at about 350 F for 30 minutes to heat it thoroughly before serving.


Growing Winter Squashes
A beautiful harvest of Stella Blue Hokkaido, pictured below. Squashes are easy to start from seed, and by growing your own you'll have the best choice of heirloom varieties. 

Although direct planting into a prepared mound is often recommended (with good compost or organic fertilizer), I've had success starting my seeds in containers and transplanting the seedlings after they have developed leaves and are about four inches high.

Plant in spring as soon as the temperatures at night are in the 50's F and the soil has warmed, so that you get as much warm weather growing time as possible. They like regular water and grow quickly with a sprawling habit, so give them room on the ground or let them climb up a trellis. If you let them climb, you'll have to provide support when the squashes develop so they don't fall off!

Check Seed Saver's Exchange and Seeds of Change for seeds.


The beautiful Stella Blue Hokkaido squash is my favorite

Photos: Patricia Larenas, Urban Artichoke

Monday, July 9, 2012

To Grow is to Give and Share


As we enjoy the long-awaited seasonal delights from our gardens, I was thinking that we could all use a little reminder to donate to our local food banks. There are good resources on the web that will help you find a food bank near you.

Ample Harvest is a great web site devoted to doing just that.

Sharing the bounty at harvest time comes naturally to gardeners - growing means giving. Sometimes we are sharing only with our families, but most often it's with our neighbors and community too. Planting a few extra vegetables to donate for those in need is a simple but powerful way for urban gardeners to contribute to the well-being of all members of our communities.  

Growing food is a fundamental human activity that leads naturally to sharing our abundance with our neighbors.

At my local food donation center, CommunityServices Agency (CSA) in Mountain View California, on average over 200 people a day shop at the agency’s Food and Nutrition Center for food to supplement what they and their families have to eat. The most popular items are fresh fruit and vegetables, and sadly there is often not enough of these to distribute. Donations of fresh herbs are also welcome and gardeners usually have an abundance of prolific herbs (oregano, thyme, mint, basil, etc.).

Most gardeners are  happy to contribute their surplus garden produce to feed the hungry, but the challenge is raising awareness about this simple but critical act. It truly makes an enormous difference to those who just can't afford fresh produce on a regular basis.


So this summer get the most out of your luscious ripe tomatoes - think of those grateful and happy families benefiting from your generosity and thoughtfulness. Then remind your friends and neighbors to donate too!

Please share your favorite ways to donate your extra garden harvest - you might inspire someone to do the same...

A version of this post was published on Eat Drink Better

Photos: Patricia Larenas, Urban Artichoke

Wednesday, May 30, 2012

Urban Artichoke on Earth911 and Huff Po

Good job Alexis! 

Last week Alexis Petru interviewed me for her article 5 Simple Ways to Start Growing Edibles for Earth911 and the post got picked up by the Huffington Post.

I love to see that people are excited about growing their own beautiful food to share with family and friends.  And it's not that we have to grow everything we eat to feel good about edible gardening - I still love my weekly trip to the farmer's market and I know that our small local growers value my support.

So take advantage of the season and go get dirty!


Gorgeous Violetto artichokes


Photo: Patricia Larenas

Growing Potatoes in a Container


Eating fresh organically grown potatoes will spoil you, and there are many delicious varieties you can find at your farmer’s market and a few grocery stores. They come in a range of colors: purple, bluish, rosy red and gold colored. If you’d like to try growing your own, here’s a really easy and fun way to grow your favorites in a container at home. 

I tried a Yukon Gold, above, and a Russian Banana that I haven't harvested yet. I collected both of these at my Farmer's Market.

You don’t have to have special seed potatoes, if your potato sprouts, it will grow. It helps if it’s fresh and hasn’t been in storage for a long time, or sprayed with any sprout inhibitors. That’s why getting them from a local organic grower is advisable, if you can. You can also order seed potatoes from Wood Prairie Farm or Seed Savers Exchange.

You Will Need:
A 12 inch pot (measurement across the opening of the pot)
Potting soil
Organic fertilizer
1 -2 Small fresh potatoes, sprouted


Assemble Your Potato Container in Three Steps

1. Put soil one third up in a 12 inch pot (soil based potting mix)
2. Mix in a small handful of organic fertilizer, such as Dr. Earth or EB Stone.
3. Place a sprouted potato in the center and cover with about 2 inches more of the potting soil.


When the plants are about 6 inches in height, add more soil up to the leaves.  Do this until the container is full with soil up to the rim. Water the container and allow the plant to grow. Harvest the potatoes when flowers begin to open or the foliage begins to die back.


Instructions from: The American Horticultural Society's great book Plant Propagation, A. Toogood

Photos: Patricia Larenas

This post was published on Eat Drink Better


Tuesday, April 10, 2012

Using a Cold Frame to Start Your Summer garden

-->
You can build your own or buy a cold frame that is a mini-greenhouse

Using a cold frame is a fantastic low-tech way to start your seeds for a summer vegetable garden ahead of the summer/spring growing season.

I mentioned using a cold frame in my previous posts, How to Grow From Seeds and Growing and Transplanting Seedlings.  A cold frame can be used in different ways and will give you more flexibility in starting your plants for a summer vegetable garden. Even if you have a long growing season, you'll have your yummy veggies on the table earlier in the summer than if you wait to sow your seeds directly in the soil.

What is a Cold Frame?
Cold frames are a great low-tech way to create a protected mini-environment for cold sensitive plants. They can be made with wooden sides, with a glass lid using old windows, or with fiberglass or plastic (polycarbonate or acrylic) sheets to let in sunlight. Some are made entirely of plastic or glass, like a small greenhouse. The top is movable for venting, because cold frames will heat up quickly (think of how fast your car heats up with all the windows rolled up). You will need to prop the top open varying degrees, and it’s also helpful to be able to remove it. They can be set on bare ground over a planting bed, or on paved areas. They are generally small for home use, about 4 to 6 feet long, 2 to 3 feet wide, and 1-2 feet high.

My cold frame is a Juwel BioStar 1500 with polycarbonate panels, and beagle proof!

-->
Managing the Cold Frame Environment
Place your cold frame in an area that gets the most hours of direct sunlight. On sunny days you’ll have to be very careful to prop the cold frame’s top open so that your plants (especially tender young seedlings) don’t dry out or get damaged by too much heat. You can start to acclimate your seedlings to ambient temperatures by propping the lid open just an inch or two at first on cold days, then wider as it gets warmer.

I leave it closed up at night, and prop the top open (or remove it) when the sun starts to hit the structure, depending on the air temperature. If it’s below 60° F and cloudy I leave the top on, but propped open. At 60° F and above I’ll remove the top until the sun sets, then put it back on for the night. For daytime temperatures on in the 40's and lower you may just leave it closed. High humidity could cause problems fungal diseases, but if temperatures are cool, it’s less likely.

Check your young plants for moisture at least every day, and more often if the cold frame is warm. If you are germinating seeds, remember that they have to remain evenly moist at all times.

Save $$ by Growing Your Own
If you like growing vegetables from seed I think you'll discover as I did, that a cold frame is a fantastic way to have nursery-quality seedlings ready for your summer vegetable garden when planting time rolls around.

 This post was also published on Eat Drink Better.

Photos: Patricia Larenas, Urban Artichoke

Monday, March 19, 2012

Edible Landscaping: Growing and Transplanting Seedlings


So you’ve started your seeds indoors to get a jump on spring, and like magic they are beginning to grow. Now you’ve got seedlings. The excitement of having grown your own starts for your vegetable garden can turn into panic if it is still too cold to plant them in the garden. Here are my tips and "how tos" for managing seedlings for your edible landscape.

What is too cold?

It’s still too early to plant warm season vegetables into your garden if:
1. Frost is still a possibility in your area (check for the last expected frost date).
2. Nighttime temperatures are still below 50° F.
3. The ground hasn’t warmed up enough.

Growing Your Seedlings

The young seedlings will grow fast indoors and if you don’t give them the right conditions they’ll become weak and spindly. If you plant them in this condition they’ll under-perform and it will be disappointing.
As I wrote in my How to Grow From Seeds post, to raise strong seedlings you need to meet three basic requirements in addition to moisture: light, nutrients and temperature.

Seedlings in my backyard cold frame
Light:
Once the seeds start to grow they'll need either direct sunlight, or exposure to lights indoors. Your options are to hang lights over the seedlings if they’re indoors (12 hours daily), or to move them outside into a cold frame in the sun. The cold frame works well if outside temperatures are at least 40° F. If nighttime temperatures are too cold, bring them back inside for the night.

Nutrients:

Feed the young plants with liquid fertilizer.  I use an organic dry fertilizer mix, such as Dr. Earth.  Soak it overnight in water (read the directions- it will be about 1 cup dry fertilizer to a gallon of water). Then use the liquid half strength to feed your plants weekly, and put the solids into your garden bed. You can also use a cup of mature compost from your compost pile to make a compost tea. Put the compost into a piece of cheese cloth to make a big tea bag and soak it for about fours days before you use it. It may not be as nutrient-rich as the fertilizer mix, but it’s good for the seedlings (remember: fertilizer is not necessary until the leaves begin to grow).

Temperature:

Protect from frost and temperatures below 50° F for warm season vegetables. I germinate seeds indoors, then keep the seedlings out in my backyard cold frame. I remove the cold frame lids on sunny days so it doesn’t get too warm, and close it up at night. Warm season veggies include: tomatoes, beans, squash, cucumbers, peppers, and eggplant. Spinach, lettuce, chard, kale, peas broccoli and cauliflower,
are all cool season veggies and have some degree of resistance to frost and prefer cool temperatures.

Transplanting Seedlings Into Containers

If your seedlings are in a flat, or getting crowded in their containers, transplant them individually into six packs or small pots to give them a chance to develop a healthy root system while you wait for the season to warm up.

Handle the seedling carefully to avoid damaging the roots or stem

1. Plant seedlings into damp potting soil (it has good drainage). Alternatively, a friend of mine uses his own mature compost and this seems to work.
2. Make sure your seedlings are in damp soil before you transfer them to the new pots.
3. Handle the seedlings by the leaves- avoid damaging the delicate stem or roots. Gently tease apart tangled roots and plant immediately.
4. Water well after transplanting and begin using liquid fertilizer.

For small seedlings, make a hole in the potting soil with a chopstick then gently push the root inside

Last but not least, after growing your plants indoors remember to acclimate them first before you plant them into the garden. Do this by bringing them out during the day to expose them gradually to direct sunlight (in a protected porch or cold frame) then bring them back inside for the night for about a week. This is called “hardening off”. It toughens them up for the outdoors.

Newly potted seedlings with room to grow

Enjoy nurturing your seedlings and watching them grow. You'll have the pleasure of starting your edible garden with the vegetable varieties you really want instead of having to grow whatever is available. But best of all, you'll have the satisfaction of knowing you can grow your own food from start to finish.

Photos: Urban Artichoke

Sunday, March 11, 2012

How to Grow Jerusalem Artichokes


Jerusalem artichokes, or sunchokes, are easy to grow and don't need a lot of extra care. Plant in the spring and harvest in the fall when they begin to die back with the first frosts. They grow vigorously and produce an abundance of tubers. Some people call this invasive, I call it free food. See below for my tips on how to manage your crop so it doesn't get out of hand.

About Jerusalem Artichokes

Jerusalem artichokes, Helianthus tuberosus, are native to North America and belong to the sunflower family. They aren't related to artichokes and didn't originate in Jerusalem, but their edible tubers do have a slight artichokey flavor. They make delicious soups, slice to saute them with mushrooms, or have them raw in salads.
For recipes my see recipe index.

Sunchokes sauteed with mushrooms

How to Plant and Grow Sunchokes

Sunchokes become available in the fall. Check your farmer's market or grocery store for tubers in the fall and winter months and save a few to plant in the spring. I stored about four tubers in a pot on my porch in potting soil over the winter protected from frost. I planted a couple of the tubers in the spring on the sunny side of our house where we had sheet composted to build up the soil over the previous winter.  

They need a sunny spot, regular water and medium quality garden soil.
In spring, plant a few tubers about 2 inches deep and about eight inches apart in loose soil in a sunny spot after all danger of frost is past. Adding mature compost to the soil is a plus.


Start with a modest sized patch, mine is about 1 1/5 feet by 2 feet. We got several pounds from a patch this size!

Water well.  Keep the soil slightly damp and they will begin to sprout. As they grow, water when the soil begins to dry out. They don't need to stay moist and can dry in between watering.

They will grow straight up and may need to be staked. Sprays of multi-branched yellow flowers bloom in August or September.


Jerusalem artichokes grow very tall and flower in late summer
To Harvest

Jerusalem artichokes are frost tender, so they will begin to die back when the frosts begin. When they die back cut the stalks to about 1 foot in height. The tubers become sweeter after exposure to cold temperatures, but you can begin to dig them up and try them right away. Keep them in the ground and dig them up as you need them. If the ground freezes in your region, mulch the tubers well with straw.


To dig them up use your hands or carefully dig with a trowel so that you don't break them up. The broken ones will rot in the ground.

Managing Your Crop: Replanting Jerusalem Artichokes

Jerusalem artichokes can become invasive if you don't manage your planting area. As spring approaches  dig up all of the tubers that you can find. Replant only a few, depending on the size of the crop you want the next fall. In this way you'll keep them under control, otherwise they will spread rapidly and form big mats of tubers! 


My growing area is bordered by bricks to help define the patch. This makes it easier to find them when I want to dig them up.

Before spring is in full swing, dig up all of the tubers and replant only a few

They will even grow under the bricks:


Monday, March 5, 2012

How to Grow From Seed


Butterhead lettuce and Dwarf Gray Sugar Peas transplanted into the garden from my cold frame

Growing vegetables from seed for your edible garden is a lot of fun and not hard to do if you keep in mind a few basics. Why go through the effort? There are lots of reasons, but my top reason is that I enjoy it: seeds are beautiful and mysterious and I love the process of nurturing them through their stages of growth. Second, I can grow heirlooms that are only available as seed, third, I can grow a larger quantity of plants economically, and in waves through the season.

It’s magical to propagate your favorite seeds successfully for generations! I hope you'll give it a try...

Purple of Romagna Artichoke seedliings watched over by a deity

Sowing Seeds in Flats Versus Direct Seeding

There are a couple of practical reasons for sowing seeds in flats or pots before putting them directly in the ground: you can start them earlier indoors so that they have a head-start by the time it’s warm enough that they can be planted outdoors (tomatoes, squash, cucumber- the summer heat loving vegetables) and better survivability.  When I sow seeds directly in the garden they have a bigger chance of drying out or getting munched on by critters.

How to Start

If you are new to growing from seed, I recommend starting with two or three vegetables or flowers to get a feel for it so you aren’t overwhelmed. Once the seeds begin to germinate you can’t forget about them- if they dry out they’ll die, and you’ll need to start over. Most seeds take about 7 to 10 days to germinate, and some take longer. It helps if they are indoors where you’ll be reminded to check them. As the season warms up you can keep your newly sown flats or pots outdoors.

Basic seed sowing equipment, including my saved seeds on the right

Basic Equipment

Potting soil (you can mix your own, but I found it’s easier to buy a big bag, premixed).
Labels, pencil, pen, or marker.
Flats or small pots, reused six-packs from buying seedlings (or other containers, such as waxed paper cups- but these need drainage holes).
Bucket or plastic container for mixing soil with water.
Spray bottle for water.
Seeds (there are several reputable organic suppliers ).
Sowing Basics

Moisten your potting soil first, then fill the planting containers

Fill the Containers

Tip: I use a bucket to mix the potting soil with water to just get it damp before filling the potting containers. It’s much easier to start with damp soil than to try and water it thoroughly once you’ve planted your seeds- trust me!
Fill the containers and lightly firm the soil (soil should be about ½ inch from the top of the container).

A comparison of sizes: squash, cucumber and lettuce seeds

Seed Size and Planting Depth

As you would guess, the sizes of seeds vary enormously from tiny lettuce or poppy seeds, to squash and bean seeds. Follow the instructions on the seed packet for the best chance of success.

Here are some general guidelines:

How deep to plant? For most seeds, plant as deep as the seed is wide (the width of the seed, not the length). So if a squash seed is ½ inch wide, it should be covered with ½ inch of soil. It is better to plant too shallow than too deep. When the seed germinates (sprouts) the embryo has just enough stored food to start poking out of the surface of the soil, and begin developing the leaves for photosynthesis, which will take over for food production. If it’s buried too deep it won’t make it to the surface. This is also why seeds don’t need fertilizer until they begin developing leaves.

Small Seeds

For tiny seeds such as lettuce, sprinkle the seeds on the surface (a flat is great for this) then cover with a sprinkle of soil. Spray the surface down with a water in a spray bottle. Next, I cover the flat with one layer of newspaper, perlite, or a fabric called a floating row cover. The idea is to keep the soil moist but to let light in until the seeds sprout, then remove the cover.

Set the containers near a sunny window indoors in a warm spot. Don't forget to label them.

Flats covered with a layer of perlite sitting in my cold frame for protection from frost

Let There Be Light

Once the seeds start to grow they'll need 4 to 6 hours of light daily. For strong seedlings move them outdoors if the temperature permits (after your last expected frost date). Alternatives are to move them into a cold frame, or keep them inside under grow lights, available from your nursery or garden supply center. Otherwise you'll have spindly weak seedlings.

Transplanting Your Seedlings

For most seedlings, wait until the second pair of leaves form. If your seedlings are in a flat, transplant them to six packs or small pots to give them a chance to develop a healthy root system before planting out in the garden. When they're ready to move outside, keep them in a protected area (a covered porch, etc.) for a few days so that they can adjust to outside temperatures before planting in the garden.

Remember:

1. Once the seeds are wet, don’t let them dry out- this is critical. Aim for even moisture when the seeds are germinating and have sprouted, but don’t let them sit soggy or they may rot (need adequate drainage).
2. Feeding the seedlings: fertilizer is not necessary until the leaves begin to grow. If you are going to transfer the seedling to a larger pot for more growth, you’ll need to give it nutrients.
For liquid fertilizer:  use an organic dry fertilizer mix, such as, Dr. Earth, soak overnight in water (read the label- some are about 1 cup dry fertilizer to a gallon of water).  You can also use a cup of mature compost from your compost pile to make a compost tea- this should soak about fours days before you use it. It won’t be as nutrient-rich as the fertilizer mix, but it’s good for the seedlings in a pinch.

Now for the hard part: choosing just a few to grow from hundreds of possibilities!

Got a favorite heirloom to grow? I'd love to know, really.

 Photos: Urban Artichoke
Published on Eat Drink Better